 Solaris 10 zones Howto
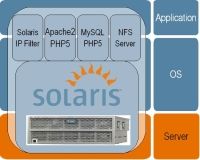
As part of the consolidation effort, it is important to evaluate the needs of the applications that will share the consolidated system. In a real example, the email server and Web server applications need to run in isolated environments that make it appear as if they are running on physically separate machines. This is made possible by a Solaris Container technology called Solaris Zones, which provides separate environments on a machine and logically isolates applications from one another. Each application receives a dedicated namespace in which to run, and cannot see, monitor, or affect applications running in another zone.
Solaris Containers—Sun’s operating system virtualization technique—consists of several technologies that work together to foster improved resource management and isolate the environment from the underlying OS. With Solaris Containers, organizations can determine how to allocate resources among applications and services, and ensure they do not interfere with one another.

As part of the consolidation effort, it is important to evaluate the needs of the applications that will share the consolidated system. In a real example, the email server and Web server applications need to run in isolated environments that make it appear as if they are running on physically separate machines. This is made possible by a Solaris Container technology called Solaris Zones, which provides separate environments on a machine and logically isolates applications from one another. Each application receives a dedicated namespace in which to run, and cannot see, monitor, or affect applications running in another zone. See Figure 2.

All of this is done on a software level, and by default every Solaris 10 machine has a global zone – only from this zone you can view processes of all the rest zones on your system. You probably didn’t even notice, but upon the completion of your Solaris 10 install, you’re immediately put into the global zone. It’s very easy to see this zone:
# zoneadm list –vc
ID NAME STATUS PATH
0 global running /
So, the first step is to configure a zone. This is done by zonecfg:
# zonecfg -z z-01
z-01: No such zone configured
Use ‘create’ to begin configuring a new zone.
zonecfg:z-01> create
zonecfg:z-01> set zonepath=/zones/z-01
zonecfg:z-01> set autoboot=true
zonecfg:z-01> add fs
zonecfg:z-01:fs> set dir=/zones/z-01
zonecfg:z-01:fs> set special=/dev/dsk/c0t1d0s3
zonecfg:z-01:fs> set raw=/dev/rdsk/c0t1d0s3
zonecfg:z-01:fs> set type=ufs
zonecfg:z-01:fs> end
zonecfg:z-01> add net
zonecfg:z-01:net> set physical=e1000g0
zonecfg:z-01:net> set address=192.168.0.10
zonecfg:z-01:net> end
zonecfg:z-01> add attr
zonecfg:z-01:attr> set name=comment
zonecfg:z-01:attr> set type=string
zonecfg:z-01:attr> set value=”z-01 server”
zonecfg:z-01:attr> end
zonecfg:z-01> verify
zonecfg:z-01> commit
Lets explain what we have done here. As you can see there are some config levels for the zones. Starting we create the zone and set the path and the autoboot option which is wherever you want your zone to boot after the host machine has been booted. Then we continue with network setup of the zone (add net),which means configuration of an alias for the nic of host machine. Finally we added a comment section, just to help us recognize the zone.(add attr) Next step is to verify and commit these settings. If you want to review them just type info after commit.
zonecfg:z-01> info
bootargs:
pool:
limitpriv:
scheduling-class:
ip-type: shared
inherit-pkg-dir:
dir: /lib
inherit-pkg-dir:
dir: /platform
inherit-pkg-dir:
dir: /sbin
inherit-pkg-dir:
dir: /usr
fs:
dir: /zones/z-01
special: /dev/dsk/c0t1d0s3
raw: /dev/rdsk/c0t1d0s3
type: zfs
options: []
net:
address: 192.168.0.10
physical: e1000g0
attr:
name: comment
type: string
value: “z-01”
The new thing here is the inherit-pkg-dir which means that the zone will use the same directory as the host to save storage and have the same elements as the global zone. This means that the zone will be able to see /usr,/sbin,/platform directories but can’t write on them because only the global zone can write into those directories.
Right now our zone is in a “configured” state – it can’t be used until we install OS onto it and it gets its unique ID. Obviously, you won’t be able to boot your zone unless it has installed OS.
# zoneadm list –cv
ID NAME STATUS PATH
0 global running /
– z-01 configured /zones/z-01
Here’s a list of the states a non-global zone can be in:
configured – our zone is configured, but it’s yet to have its initial boot
incomplete – zoneadm command sets a zone’s state to this value while installing and uninstalling a zone. When the operation is completed, zone’s status is changed.
installed – zone is fully configured, OS packages have been installed. It’s a ready-to-use zone, all you have to do is to boot it. The zone has no virtual platform associated yet.
ready – the zone is ready. It already has a virtual platform established, the kernel has created a zsched process, all the network interfaces are plumbed, devices are configured and file systems are mounted. No processes have been started yet, but since the zone is ready it already has a unique ID assigned to it. We normally don’t see a zone in this state, and it always moves one to the next one – running.
running – the zone is up and running. You can connect to the zone. It’s a fully working environment now.
shutting down and down are short-term states which are shown when the zone is being halted. Upon completion of halt, the zone gets back into installed state.
This figure explains the steps for zone configuration – installation.

Now, we have successfully configured z-01 zone , lets install it:
# zoneadm -z z-01 install
Preparing to install zone <z-01>.
Creating list of files to copy from the global zone.
Copying <2561> files to the zone.
Initializing zone product registry.
Determining zone package initialization order.
Preparing to initialize <1143> packages on the zone.
Initialized <1143> packages on zone.
Zone <z-01> is initialized.
The file </zones/z-01/root/var/sadm/system/logs/install_log> contains a log of the zone installation.
After this you can watch the process of packages installation for this zone, and when all the packages are installed, you’ll get the location of the OS installation log file. That’s it! Zone z-01 is ready!!Now, its time to boot the zone:
# zoneadm -z z-01 boot
Lets see the actual state of zones.
# zoneadm list –civ
ID NAME STATUS PATH BRAND IP
0 global running / native shared
1 z-01 running /zones/z-01 native shared
As you can see both zones are into running state.
What we need now is connect to the zone’s console and answer all the standard Configuration Assistant’s questions, one of them is the root password. After this, your zone will want to reboot, and you’ll be able to log in as root on your console.
To login to the z-01 zone use zlogin, -C means “console”:
# zlogin -C z-01
You can disconnect from the console using the standard combination: “~.” (tilda dot – Use as many ~ as telnet/ssh depth)
After you have answered all the questions and reboot the zone your zone is ready.
If autoboot didn’t work as expected, then you should check the zones service:
# svcadm enable zones
In this time you can check your network interfaces with ifconfig -a
and you will see the zone alias of the ethernet interface.
Since non-global zones will share the physical network interface with your global zone – you’ve got to make sure your system (your global zone) can see your non-global zones networks.
If you want to have the benefits of zfs then you have to make some initial steps before this guide.
First create a zfs pool. You can use disk, partition…
# zpool create -f zones c0t0d0s3
Now we have created the pool, lets see it.
# zpool list
NAME SIZE USED AVAIL CAP HEALTH ALTROOT
zones 34.5G 77.4M 34.4G 0% ONLINE –
The path will be /zones where all zones will be installed. Lets create our zone.
# zfs create zones/z-01
c0t0d0s3 has 34.5 Gigabytes of disk space. But i want the new zone to have 10G, so we set the quota
# zfs set quota=10g zones/z-01
When running the zones with zfs this command is critical. If you don’t specify it, then you won’t be able to install the zone
# zfs set mountpoint=legacy zones/z-01
Check the zfs filesystems. Here we can also see the disk space. See on the second zone that the available is 10G.
# zfs list
NAME USED AVAIL REFER MOUNTPOINT
zones 2.21M 34.0G 2.10M /zones
zones/z-01 24.5K 10.0G 24.5K legacy
Ok now we proceed to the beggining of this guide. We have only to specify zfs file system in the configuration of zone.
# zonecfg -z z-01
z-01: No such zone configured
Use ‘create’ to begin configuring a new zone.
zonecfg:z-01> create
zonecfg:z-01> set zonepath=/zones/z-01
zonecfg:z-01> set autoboot=true
zonecfg:z-01> add fs
zonecfg:z-01:fs> set dir=/zones/z-01
zonecfg:z-01:fs> set special=zones/z-01
zonecfg:z-01:fs> set type=zfs
zonecfg:z-01:fs> end
zonecfg:z-01> add net
zonecfg:z-01:net> set physical=e1000g0
zonecfg:z-01:net> set address=192.168.0.10
zonecfg:z-01:net> end
zonecfg:z-01> add attr
zonecfg:z-01:attr> set name=comment
zonecfg:z-01:attr> set type=string
zonecfg:z-01:attr> set value=”z-01″
zonecfg:z-01:attr> end
zonecfg:z-01> verify
zonecfg:z-01> commit
zonecfg:z-01> info
bootargs:
pool:
limitpriv:
scheduling-class:
ip-type: shared
inherit-pkg-dir:
dir: /lib
inherit-pkg-dir:
dir: /platform
inherit-pkg-dir:
dir: /sbin
inherit-pkg-dir:
dir: /usr
fs:
dir: /zones/z-01
special: zones/z-01
raw not specified
type: zfs
options: []
net:
address: 192.168.0.10
physical: e1000g0
attr:
name: comment
type: string
value: “z-01 server”
# zoneadm -z z-01 install
Preparing to install zone <z-01>.
Creating list of files to copy from the global zone.
Copying <2561> files to the zone.
Initializing zone product registry.
Determining zone package initialization order.
Preparing to initialize <1143> packages on the zone.
Initialized <1143> packages on zone.
Zone <z-01> is initialized.
The file </zones/z-01/root/var/sadm/system/logs/install_log> contains a log of the zone installation.
# zoneadm -z z-01 boot
Now you have zones with zfs file system. Some really cool benefits are the shared storage of the zones in a pool, quotas, compression, snapshots and zone cloning.
Summary
Once a zone has been created and a ZFS file system has been allocated to it, the administrator for that (non-global) zone can create file systems, take snapshots, create clones, and perform all the other functions of an administrator—within that zone. Yet the global zone, and any other zones, are fully isolated from whatever happens in that zone.
The integration of Solaris Containers and Solaris ZFS is just another way that the Solaris 10 OS is providing cost benefits to customers by allowing them to safely consolidate applications and more easily manage the data those applications use.