The pandemic has left my usual calendar of events in shambles this year. Where I’d have expected to have spent a significant portion of my summer mingling with our wonderful and diverse community worldwide, instead I’m sitting at home cracking open a solitary Club-Mate and listening to muffled techno music while trying to imagine myself in a field somewhere alongside several thousand hackers.
As a knock-on effect of the event cancellations there’s another thing missing this summer, the explosion of creativity in the world of electronic conference badges has faltered. Badges are thin on the ground this year, so the few that have made it to production are to be treasured as reminders that life goes on and there will be another golden summer of hacker camps in the future. This year, the CampZone 2020 badge was given its own voice and perform neat tricks like presenting a programming interface via WebUSB!
A Badge, That Isn’t Quite A Badge
CampZone is a European event mostly for the gaming community but incorporating the HackZone event within it. The in-person conference has been cancelled this year and gone online like so many others, but that hasn’t stopped its badge creator Tom Clement and team bringing out the CampZone 2020 badge anyway.
The result is the AerPane, pronounced “Ear-pain” in a reference to the 2019 i-Pane, and a design that continues the theme of CampZone badges by providing an in-your-face multimedia experience for musical experimenters with onboard speakers and a very bright LED-lit 16-key silicone keyboard. It runs the well-established badge.team firmware under the skin, so when I ordered my badge I was interested to see just how they had managed to incorporate a rich interface into such minimal UI hardware.
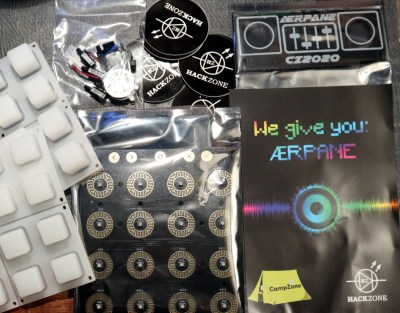
In my package from the Netherlands was the badge kit, containing two PCBs, a bag of hardware, and the silicone keyboard overlay. The badge could be ordered with either of two versions of the keyboard, one with 12 mm tall keys and the other that I fitted with shorter ones about 8 mm. The main PCB is about 111 mm by 100 mm and has a row of touch buttons, the keypad button contacts, and the LEDs on the top with the rest of the components on the underside. The smaller PCB meanwhile is about 40 mm by 100 mm, holds the speakers, and is connected via a short flat ribbon cable. Assembly was fairly straightforward, with the silicone held in place by the plastic stand-offs that double as a stand for the badge, and the speaker board secured by a pair of clip-on 45 degree plastic angle brackets. The speakers themselves are secured with a self-adhesive ring, and have small PCB connectors. The fiddliest part of the assembly is fitting the ribbon cable, something in which I found a good pair of tweezers to be very useful.
Source:: Hackaday